BACK
BACK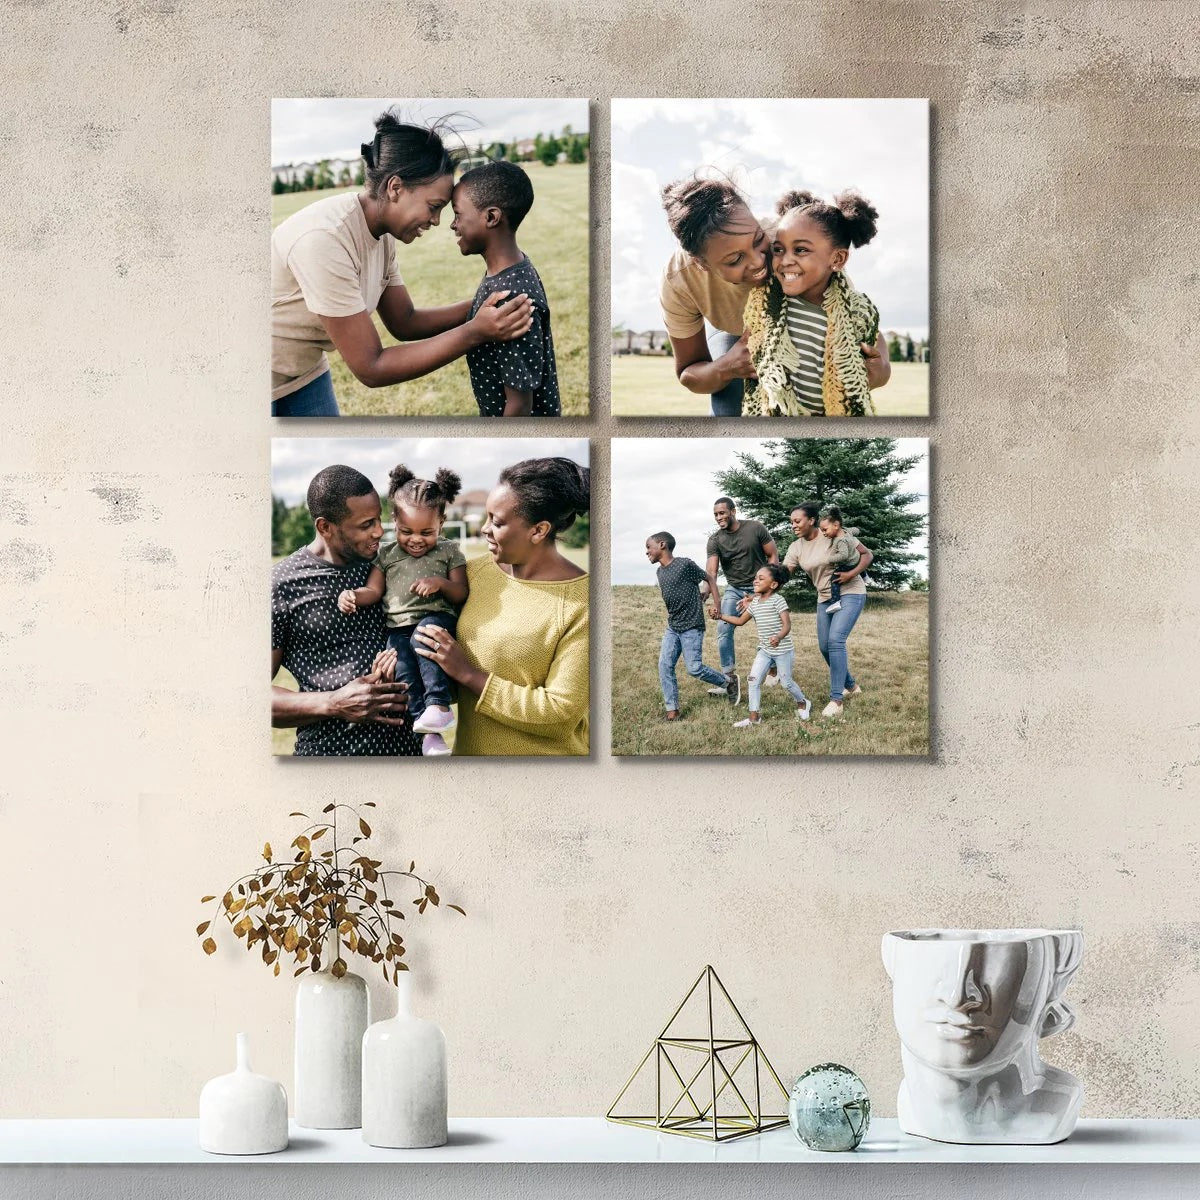

In today’s digital age, we take more photos than ever before! What do you do with your photos after they’re captured? Rather than letting them disappear into the void of our iPhone albums, consider preserving the most precious moments for years to come. Personalized foam photo tiles are a fantastic way to display your favorite photos, allowing you to preserve and showcase your cherished memories. Not only are these tiles easy to hang and rearrange, but they can also be personalized with your very own images! You can create a unique and meaningful display. In this article, we will explore everything you need to know about our collection of custom photo tiles, from how to arrange them to how to make the most of your sweetest moments. Learn how to perfectly execute these photo tile wall ideas.
What Are Photo Tiles?
Personalized foam photo tiles are a unique way to display your favorite memories in your home. These tiles are made from lightweight, high-quality foam that is easy to hang and range in any pattern your heart desires! You get to upload your own photos, allowing you to create a one-of-a-kind work of art. You can opt for a single tile…or countless! There is no limit to the number of tiles you can order. The images are printed directly onto the foam, creating a vibrant and durable display that will last for years to come. Whether you want to showcase your family photos or travel memories, personalized photo tiles offer a creative way to give your interior a personal touch.
Create your own photo tiles >>

How to Hang Tiles on Wall
Hanging foam photo tiles is a breeze thanks to their lightweight construction and easy-to-use hanging system. Start by deciding on the arrangement of your tiles, whether it be a simple grid or a more eclectic pattern. Then, determine the desired spacing between each tile and mark the spot on the wall where you want each tile to hang. The foam photo tiles come with an adhesive back that allows you to easily attach them to your wall without any additional tools or hardware. Peel the backing off of your tile to reveal the adhesive strip and carefully press the tile onto the wall, making sure it’s level with the surrounding tiles. Repeat this process until your display is complete. Voila! Easy-peasy.
Discover photo tile wall ideas >>

Photo Tiles Layout Ideas
When it comes to photo tile layout ideas, the possibilities are endless. One popular layout is a simple grid pattern, where the tiles are evenly spaced apart in rows and columns. Another option is to create a more organic, free-form layout. For example, you could create a heart shape using your tiles, or arrange them in a diagonal pattern for a unique and dynamic display. You can choose a symmetrical look with two or four tiles, or you can create something oversized and eye-catching. When arranging your tiles, consider your personal style and interior goals. Your interior should appear cohesive. If your space is predominantly playful, have fun with an unconventional layout. For a more minimalist interior, stick with something simple.
Shop more picture tiles ideas >>

Tiles on Walls in Living Room
Foam photo tiles are a great way to add a personal touch to your living room walls. To start, consider creating a gallery wall with a mix of family photos and travel snapshots. Don’t be afraid to hang photo tiles on a wall that already has items like mirrors, tapestries, or shelves. Photo tiles are low profile and easy to move, which makes them an ideal choice for just a pop of visual interest. Because your living room is a communal space, it’s the perfect area to show off your favorite moments with those you love most. Choose a cohesive color palette for your photo tiles to maintain a chic look that won’t compete with the rest of your space. Whether you opt for a bold and colorful display or a more muted, neutral look, foam tiles offer endless possibilities to express yourself in the center of your home.
Explore photo tile layout ideas >>

An Entire Photo Tile Wall
Looking for a REALLY bold and dramatic way to showcase your photos? Try covering almost an entire accent wall in foam photo tiles. It doesn’t get more eye-catching than that! This approach allows you to create a large-scale collage of your favorite memories, turning your wall into a piece of art in itself. To start, choose a large, blank wall that needs a little pizazz. Then, decide whether you want to equally space apart your tiles, or go with a more nonlinear look. In our opinion, a giant grid is the best option when involving this many pieces! It’s also important to choose a color scheme so the focus is on the photos, rather than a hodge-podge of shades. A full-scale photo tile wall is also a great addition to a family room or kids’ playroom. Another option is to add a foam tile wall to your children’s room to remind them of your family’s sweetest memories.

Endless Design Options
By printing your own photos onto these lightweight and durable tiles, you can preserve your cherished memories and create a one-of-a-kind piece of art that reflects your unique personality and style. With endless possibilities for layouts and arrangements, custom photo tiles allow you to create a truly distinct and meaningful display that will brighten up any space. Whether you're looking to decorate your living room, bedroom, or workspace, custom photo tiles are a fantastic option that offers both aesthetic appeal and sentimental value. Family photos can reach new heights with these convenient, affordable custom options.
For more interior design ideas and top-trending wall decor, visit our inspiration blog. Your interior is your opportunity to express yourself and make your space feel true to you!

RECENT ARTICLES


CATEGORIES

 GET OUR TIPS!
STRAIGHT TO YOUR INBOX